How to Paint 2019 Ford Mustang Brake Calipers
- Forums
- TECH
- Cosmetic/Visual Mods (Exterior + Interior)
PROPER Brake Caliper Painting how-to
- Thread starter jake_zx2
- Start date

- Joined
- Jun 19, 2016
- Messages
- 2,305
- Reaction score
- 1,403
- Location
- Texas
- Vehicle(s)
- Kona Blue 2018 GT
- Vehicle Showcase
- 1
- Thread starter
- Banned
- #1
So today, I'm going to go over the CORRECT way to color your calipers for the best results. Now, keep in mind, I said "color"... Yes, this is a how-to on painting calipers, but I say "color" because if you talk to Brembo (manufacturer for all front mustang calipers sans non-PP ecoboost and V6), they will personally advise against powdercoating their calipers. I can't exactly explain why, but I was told that when it comes to Brembo calipers, powdercoating is a no-no and painting is the way to go.
Now, some of you may say "But Jake, I'm not a ricer, why would I want to paint my calipers?". Well first off, painting can withstand extremely high temperatures and will take plenty of track abuse. Second, you may be in a situation like me where you bought either used Brembo calipers or a used car with calipers that just looked like hell (on mine, bare metal was showing in quite a few places, which could have sacrificed the integrity of the brakes).
So ultimately, painting your calipers a lot of the time can be a great option for more than just appearance, and is MUCH cheaper than powdercoating for a better result. So lets get started... things you're going to need before starting this process;
90% Isopropyl Alcohol
Spare Microfiber rag
Scotch Blue Painter's Tape
VHT high temp caliper paint (any color, link to red -> https://www.amazon.com/gp/product/B01LW16LIC/ref=oh_aui_detailpage_o02_s00?ie=UTF8&psc=1 )
VHT high temp caliper clearcoat ( https://www.amazon.com/gp/product/B000CPJLV2/ref=oh_aui_detailpage_o00_s01?ie=UTF8&psc=1 )
Wire brush drill attachment (and, of course, a drill) ( https://www.amazon.com/gp/product/B004UUAD4E/ref=oh_aui_detailpage_o00_s00?ie=UTF8&psc=1 )
(Optional) High Temp "Brembo" caliper stickers ( https://www.amazon.com/gp/product/B00ZPQKG0I/ref=oh_aui_detailpage_o01_s00?ie=UTF8&psc=1 )
(Optional) OEM Ford Caliper seal kit
300 grit sandpaper and 700+ grit sandpaper
And a Toaster Oven
BE FOREWARNED: This process will require having the calipers off the car for a fairly long period of time (1-2 full days).
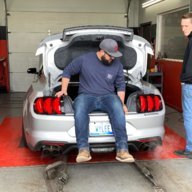
Step 1: Using your drill and wire brush attachment, strip the calipers of their original finish. make sure to get in evert spot that will be painted (see Step 4) to the best of your abilities, as the paint will adhere differently if certain spots are left with paint residue. Pictured is one caliper completely stripped, one with original finish. To make it easier, I removed the bleed screws and stuffed the hole with painter's tape, using tweezers to extract the tape at the end of the process.
Step 2: If choosing to also rebuild the seals, this is where you will disassemble the caliper
Step 3: Using your isopropyl alcohol and microfiber rag, wipe down the caliper. Make sure to get any excess metal shavings off the calipers, and be sure to get inside all the crevices of the caliper. If you leave metal shavings, the paint may not adhere correctly or may leave an uneven finish.
Step 4: Using your painter's tape, mask off the area inside of the calipers where the pistons are located. I personally felt more comfortable leaving the OEM finish around the pistons.
Step 5: Begin painting! You'll want to use fairly light coats as to prevent the paint from running. I used about 5-6 coats of paint on the whole caliper, which just about completely used up my can of paint. Allow about 45 minutes-1 hour between coats, with 1 1/2 hours for the final coat, for drying.
First coat:
Third coat:
Final coat:
Step 6: Time to get baked! Set your toaster oven (or a full size oven, I just didn't want my house smelling like paint) to 350 degrees F. Once adequately preheated, place the calipers (I was only able to fit one at a time) in the oven and let them bake for about an hour. This will give a glossy finish, help the paint adhere to the metal, and help to harden the paint. After baking, allow the calipers to sit and cool for about 2 hours.
Step 7: Clearcoat time! Same idea as painting with the light coats, but only do about 3 coats of this.
Step 8: Sand it down! I know, this seems counter-intuitive, but trust me, it leaves a much better finish, as it helps to smooth any imperfections in the paint. In this picture, the circled corner was sanded down, and you can see how much more smooth the finish is than on the rest of the caliper.
Start with about 300 grit sandpaper, then once done with the whole caliper, go back over it with a much higher grit (I had 1000 grit laying around, and it's so fine that it almost feels soft). once you're done sanding it, use your microfiber rag and isopropyl alcohol to once again wipe down the whole caliper.
Step 9: Final clearcoat. After wiping down the sanded calipers with isopropyl alcohol, hit them with 1 or 2 more coats of clearcoat. This should leave a very smooth, glossy finish over whatever color you decide to paint your calipers
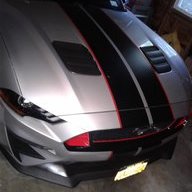
Step 10: Apply stickers. I took a measurement from top to bottom and left to right of the flat portion, subtracted the height and width of the stickers, then used painters tape to mark where the edges of the stickers should line up to center them on the caliper. Some people prefer to put clearcoat over the stickers, but I advise against this for 2 main reasons; 1. When exposed to high heat, clearcoat has a tendency to yellow slightly. This doesn't matter too much when it's over a color, but when it's over white (like the stickers), it will stick out and won't look too good, and 2. because if there's ever an issue with the stickers, it's easier and cheaper to just peel and re-apply new stickers than it is to cut through the clearcoat, apply new stickers, then apply more clearcoat while also taking a chance of damaging the paint and needing to completely repaint your calipers. These pictures are what my finished product looked like, and if you did everything correctly, yours should look the same or better.
If you guys have any questions, feel free to comment on this thread or PM me, as I'm fairly active on this site. Also, if you'd like, post your results in here! I'd love to see how your calipers turn out!
- Joined
- Jul 29, 2018
- Messages
- 382
- Reaction score
- 257
- Location
- Royal Oak, MI
- First Name
- Bryan
- Vehicle(s)
- 1994 Mustang GT, 2018 Mustang GT
- #3
:dead:2 hours work with G2 self leveling caliper paint.
I'd be interested in seeing if stripping it down bare and building it back up provides any extra longevity in the paint. I would of thought that some sort of high temp self leveling primer should have been used before the color layer but I don't know anything. I've done numerous sets of calipers with engine block paint, and caliper clear, and never had an issue.
Side bar: the reason brembo advises against powdercoating is because they say heating them up for powder to bake effects the caliper's annealing process, but I've also seen calipers get hotter from a track session than powdercoating so I'm not a believer. They just don't want to be liable if backyard powdercoaters bake the bitch to 500* and something does change in the structure of the caliper.
- #4
Though your process looks great don't underestimate the quality of finish you can have with G2 products.
- Joined
- Jul 9, 2016
- Messages
- 615
- Reaction score
- 263
- Location
- Long Island, NY
- Vehicle(s)
- 2018 Silver Mustang PP1 Manual (former 2015 GT Auto)
- #5
Did my '15 with it and it still looked fantastic when I turned it in 3 years later.2 hours work with G2 self leveling caliper paint.
His came out nice....but truthfully I don't see much difference, and once they're on the car behind the wheel, you're not going to notice unless you've got your face in there checking it out (and assuming it's just been cleaned).

- Joined
- Mar 21, 2016
- Messages
- 605
- Reaction score
- 205
- Location
- Des Moines, IA
- First Name
- Mark
- Vehicle(s)
- 2016 Mustang GT w/PP - Race Red
- #6
Did you do those on the car or pull them? I have the kit and am getting ready to get to it now that the weather is cooling down.These are the GT non-PP calipers. they come bare with no finish. This is actually my second coat on them. I did the first 3 years ago. They've gone through several track days and 2 winters. I decided to paint them again when I changed out the pads and rotors.
Though your process looks great don't underestimate the quality of finish you can have with G2 products.
- Joined
- Jul 9, 2016
- Messages
- 615
- Reaction score
- 263
- Location
- Long Island, NY
- Vehicle(s)
- 2018 Silver Mustang PP1 Manual (former 2015 GT Auto)
- #7
On the car. No reason to go through the pain in the ass of removing them. Just get some blue outdoors painters tape, a good wire brush, some 91% isopropyl, and wash the car first, making sure to clean the brake area. Put it on stands, clean them with the brake cleaner and brush, wipe off with alcohol, tape off what you don't want painted, and go to town. You don't need to bother with the far side since it's just cosmetic.Did you do those on the car or pull them? I have the kit and am getting ready to get to it now that the weather is cooling down.
- Joined
- Jul 10, 2018
- Messages
- 48
- Reaction score
- 30
- Location
- Aus
- Vehicle(s)
- Jeep
- #8
I wonder how they'd polish up, is that even a thing...?
- Joined
- Jun 19, 2016
- Messages
- 2,305
- Reaction score
- 1,403
- Location
- Texas
- Vehicle(s)
- Kona Blue 2018 GT
- Vehicle Showcase
- 1
- Thread starter
- Banned
- #9
Hey man, if they work good enough for you, good on ya! I'm a bit of a perfectionist, so I wanted to make sure to take the highest quality approach. Also, considering the condition of my calipers, I wouldn't have been surprised if they still ended up uneven after using G2 paintThese are the GT non-PP calipers. they come bare with no finish. This is actually my second coat on them. I did the first 3 years ago. They've gone through several track days and 2 winters. I decided to paint them again when I changed out the pads and rotors.
Though your process looks great don't underestimate the quality of finish you can have with G2 products.
Probably doable as long as you clearcoat them after stripping and polishing. If you don't, they'll probably start to weather fairly quickAfter you stripped them they look goodI wonder how they'd polish up, is that even a thing...?
- #10
I removed my calipers but didn't disconnect the brake lines. I changed my pads and rotors at the same time. You can do them on the car just as easily. Just tape up as described above.Did you do those on the car or pull them? I have the kit and am getting ready to get to it now that the weather is cooling down.
- #11
- #12
According to their website FAQs no, a clear coat is not recommended.I just ordered G2 paint because they will make a custom match and i wanted Ford Velocity Blue Pearl to match stripes and mirror caps I just had painted in that color. Does the G2 system include a clear coat, and if not, would it be a good idea to get the clear in the first post and put it over the G2? I mean for longevity.
http://www.g2usa.com/faq.html

- #13
- #14
Thanks. And I also see they say they will give you a new kit if their paint ever peels or flakes.According to their website FAQs no, a clear coat is not recommended.
http://www.g2usa.com/faq.html
- #15
I first painted mine when I got the car in March 2015. The front calipers have looked great ever since. I did have 2 rock chips on the rear caliper but they were inconsequential. I decided to repaint them when I chose to upgrade my pads and rotors. After numerous track days it was time to upgrade but the G2 finish always looked good.Thanks. And I also see they say they will give you a new kit if their paint ever peels or flakes.
- Forums
- TECH
- Cosmetic/Visual Mods (Exterior + Interior)
How to Paint 2019 Ford Mustang Brake Calipers
Source: https://www.mustang6g.com/forums/threads/proper-brake-caliper-painting-how-to.109846/
0 Response to "How to Paint 2019 Ford Mustang Brake Calipers"
Post a Comment